Linux

Motion Path

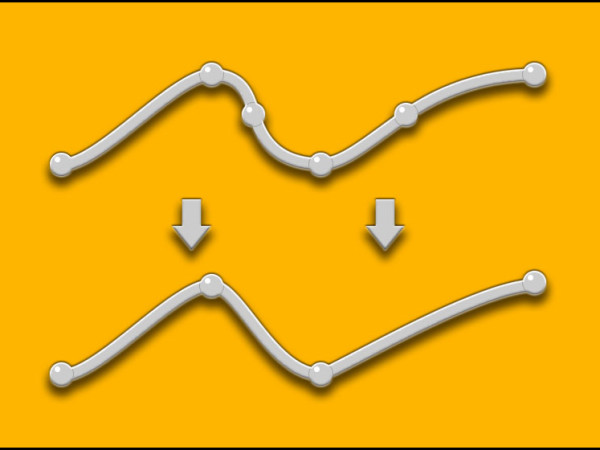
Our Motion Path tool is the ultimate solution for real-time visualization and editing of your animations in 3D space. Features: Real-time motion path visualization Camera and world space draw modes Dockable GUI Optional key frames visualization Optional "Use Pivots" mode to take modified pivots into account Optional key frame tangents visualization Optional rotational key frame visualization For objects with incoming connections, such as constraints or set driven keys, a baked/non-editable path is shown. Lock selection Interactive switch for lock selection Motion path edit tool Motion path draw tool With the draw tool on, ctrl+click on a keyframe and drag to activate stroke mode. Closest: move the keys to the closest point on the drawn stroke; Spread: distributes keys uniformly along the drawn point Multiple buffer curves Buffer Curve to Nurb Curve feature Copy 3D key frames positions inside the Maya viewport World Paste 3D key frames positions onto other objects Offset Paste 3D key frames positions onto other objects Customizable settings, such as colors and sizes Motion Path settings are saved in maya preferences Stroke Mode (Ctrl + click a keyframe and drag with the draw context activated) You can download the source code of this tool at this page: https://github.com/Toolchefs/motionPath Known limitations: Please use Maya 2017 update 4 or the tool UI will freeze when docked in the Maya UI. Everything works as expected when the UI is not docked, even on earlier Maya updates. Frames display does not show correctly On Linux (Viewport 2.0 ) Weighted paths won't display aligned-correct [...]

Soft IK Solver

Our maya IK solver is an advanced solution for 2 bones setup. It fixes the annoying "pop" problem at full extension in the normal IK system. Moreover it implements a full controllable stretch algorithm and a "elbow slide" and "elbow lock" system needed by modern rigs. The advantage of our solver is that no extra nodes are needed and for this reason is faster than current solutions. It's possible to update old rigs without creating new nodes or modifying the setup, just load our plugin and choose the tcSoftIKSolver from the ikHandle. Features: Soft extension Stretch Elbow slide Elbow lock If you are planning to use one of our tools in a studio, we would be grateful if you could let us know. You can download the source code of this tool at this page: https://github.com/Toolchefs/softIkSolver How to use: Load the tcSoftIkSolver plug-in from the Maya plug-ins window. The plug-in will automatically add a tcSoftIkSolver node in the following cases: when a scene is opened, when a scene is created, when the plugin is loaded. Once the tcSoftIkSolver will be selected as "IK Solver" for an ikHandle, some attributes will be added to the same ikHandle: Activate soft: enable/disable the soft extension. When this is disabled, the solver works like the normal maya ik, where there is the "pop" problem as the ik approaches the full extension. When this is enabled the velocity of the joints that approach the full extension position is damped by an exponential function controlled by the [...]

Kiko

Kiko stands for Keys-In-Keys-Out. It was designed specifically to handle animation curves data in a pipeline-friendly way, but it can do much more. With Kiko you can define operators that can handle different kind of data per item or channel and can work automatically across different DCCs. Currently Autodesk Maya and The Foundry Nuke are supported. Kiko was designed and implemented by Toolchefs LTD. We have decided to contribute to the 3D Industry making it open source. Kiko is written completely in python. We are looking for contributors to support more DCCs and write new operators. You can download kiko from github: https://github.com/Toolchefs/kiko Kiko has been tested on Maya 2016/2017 and Nuke 11.

Camera Lattice

Our Camera Lattice tool is the ultimate solution for mesh deformations in camera space. Attach a lattice to your camera and deform any mesh in a matter of seconds! Features: Lattice deformation in camera space Multiple lattices per camera Easily affects multiple meshes with a single camera lattice Bezier and linear interpolations Recursion parameter for bezier deformation Deform meshes with multiple camera lattices Utilities for accurate control on lattice points Gate Offset attribute to prevent weird deformations on lattice edges Influence Areas locators to localise deformation in 3D space If you are planning to use one of our tools in a studio, we would be grateful if you could let us know. You can download the source code of this tool at this page: https://github.com/Toolchefs/cameraLattice Known limitations: This version in not backward compatible with the previous! Start with a fresh scene or the GUI won't be able to gather all the information it needs. In case you load old scenes and try to use this version, unpredictable behaviors may occur! Few free maya rigs you find on the internet may not work with this tool, try it first with a free trial license! The camera lattice is a poly plane; you cannot select objects beyond it in object selection mode when looking through camera panel. You can only have one camera lattice per camera. Maya Bugs: - Viewport 2.0 does not display the lattice correctly when the camera near clip plane is different from the default value. Please use the "Legacy Default Viewport" when using [...]

Key Reducer

Have you ever had to deal with baked curves and spent way too much time in cleaning them? Or felt you were dealing with curves with too many unnecessary keyframes? Now you can reduce the number of keys in your animation curves interactively and quickly! Better curves are just one drag away! Features: Works on selected objects Reduce keys of your animation curves preserving their shapes Works on multiple curves at once Curves selection from Graph Editor and Channel Box Frame range selection for local control over keys reduction Pre Bake mode converts weighted curves into non-weighted, it fixes all your broken tangents too. You can download the source code of this tool at this page: https://github.com/Toolchefs/keyReducer

Harmonic Deformer (Maya)

The tcHarmonciDefomer is a free form deformer that uses a closed mesh (cage) to deform an higher resolution mesh. Its implementation is based on the Pixar siggraph paper: http://graphics.pixar.com/library/HarmonicCoordinatesB/paper.pdf If you are planning to use one of our tools in a studio, we would be grateful if you could let us know. Available for Maya 2014, 2015, 2016 and 2017. You can download the source code of this tool at this page: https://github.com/Toolchefs/harmonicDeformer How to use Select the object that you want deform and then the cage geometry. From the Toolchefs menu select Deformers->tcHamonicDeformer to apply the deformer. Or you can use the following mel command: tcCreateHarmonicDeformer Open the attribute editor and go to the tcHarmonicDeformer tab that was just created. Choose the cell size and the number of iterations, then press the button "Compute Harmonic Weights".  You can also compute the harmonic weights with the following mel command: tcComputeHarmonicWeights -d (deformerNode) -mi (iterations) -cs (cellsize) -ts (threshold) -sg (saveGridData) For instance: tcComputeHarmonicWeights -d tcHarmonicDeformer1 -mi 30 -cs 0.5 -ts 0.00001 -sg 0;   Deformer attributes Cell size The deformer create a 3 dimension grid to voxelize the cage and solve the laplace equation inside this grid in order to diffuse the weights of the vertices. The cell size is the dimension of the cell. If you decrease the cell size, the weights will be more smooth but more localized near the cage. The smaller the cell size the greater the weight computation time will be. It will also use more hardware resources. Please use this [...]

Harmonic Deformer (Lightwave)

The tcHarmonciDefomer is a free form deformer that uses a closed mesh (cage) to deform an higher resolution mesh. Its implementation is based on the Pixar siggraph paper: http://graphics.pixar.com/library/HarmonicCoordinatesB/paper.pdf Please note: Harmonic Coordinates are not meant to work on high poly meshes and cages. If you have a high poly character, use more than one low poly cage to localise the deformation to certain areas of its mesh. If you are planning to use one of our tools in a studio, we would be grateful if you could let us know. Available for Lightwave 11 and 2015 (64 bits). WindowsOSXWindows Download OSX Download By downloading this tool you automatically accept our terms of agreement. How to use First import your cage, then import your mesh. (THIS IS VERY IMPORTANT TO HELP LW UNDERSTAND WHICH ITEM PROCESS FIRST! ALTERNATIVELY YOU CAN CHANGE THE ITEM EVALUATION SEQUENCE IN THE SCENE EDITOR) Select the object that you want deform. Set the Subdivision order to last to improve performance. Apply the tcHarmonicDeformer deformer. Double click on the deformer. Set the parameters and click "calculate harmonic weights". (If you use high poly meshes and cages, the calculation could lock your machine!)   Deformer Parameters Use Cage Bind Transform If this parameter is on, the deformer will also take into account the cage transform delta movement from the binding position (when the weights were calculated). If you're planning to parent your cage to a bone, you might want to have this disabled. Weight Map Mesh weight map to localise/control better the [...]

Rotation Interpolator

Our tcRotationInterpolator is a maya node that interpolates an arbitrary number of rotations. The algorithm works in quaternion space to have better results compared to the standard euler interpolation. If you are planning to use one of our tools in a studio, we would be grateful if you could let us know. Available for Maya 2014, 2015, 2016 and 2017. WindowsLinuxWindows PLEASE LOG IN TO DOWNLOAD OUR ROTATION INTERPOLATOR! Linux PLEASE LOG IN TO DOWNLOAD OUR ROTATION INTERPOLATOR! By downloading this tool you automatically accept our terms of agreement. How to use Load the tcRotationInterpolator plugin. Use the following mel command to create a node: createNode tcRotationInteprolator Connect the rotation of the input object to the Input[x].inputRotation attribute. Connect the output attribute to the input rotation of your object. Node attributes Interpolation mode The node needs a reference rotation in order to interpolate the others, please choose between these modes: maxEigenValue: The node computes automatically the reference rotation by estimating the mean rotation in quaternion space (it solves a system and takes the max Eigen value). minEnergy: Same as the mazEigenValue but minimizes the energy of the system. It computes a more precise result but it's more expensive to compute. referenceRotation: It uses the rotation plugged to the referenceRotation attribute on the node. It's useful in case you have already a reference rotation, for example if you are interpolating some joints you can use the bind pose of one of them. Reference Rotation/ Reference rotation order Rotation used as reference when the interpolation [...]